Adding image track to your podcast
After you have completed your audio track, you will enhance the experience for you listeners by adding a series of still images that are timed to match specific sections of your narration. You will need 20-30 images for this process. As instructed in class, these images need to be your own original work, or copyright free images.
You will be adding these images to your audio soundtrack in either iMovie (for macs) or Windows Open Shot (for PCs). The instructions below will be for mac, but you will easily be able to use the same concepts if you are using Windows Open Shot.
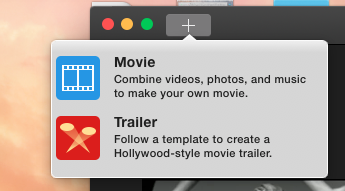
First, locate and open iMovie. You will begin by creating a new movie. You can do this either by clicking on the + button on the top left, or by going to File>New Movie. This will open a dialog box with templates - you will choose no theme, and type in a title.
You will be adding these images to your audio soundtrack in either iMovie (for macs) or Windows Open Shot (for PCs). The instructions below will be for mac, but you will easily be able to use the same concepts if you are using Windows Open Shot.
First, locate and open iMovie. You will begin by creating a new movie. You can do this either by clicking on the + button on the top left, or by going to File>New Movie. This will open a dialog box with templates - you will choose no theme, and type in a title.
|
You will then drag your audio track into the bottom workspace. Your audio track should be saved as an MP3 file -- if you're having trouble dragging and dropping your soundtrack, first guess is that you're not dragging the correct file into the space. It may be that you're trying to insert a project file, so check to be sure it's the final MP3 file.
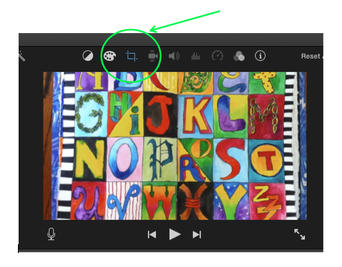
This gives you the final length of your podcast, and now you just need to add the pictures to the sounddtrack. When you drag still images into the workspace (the same way you dragged your audio in), iMovie automatically times each picture and applies an effect. You will probably want to remove this effect, to do so, click on the picture in the workspace at the bottom, and then look at the small blue crop marks, and click on that. One way to avoid this is to set the preferences up before hand (iMovie>Preferences, then remove Ken Burns and change times) |
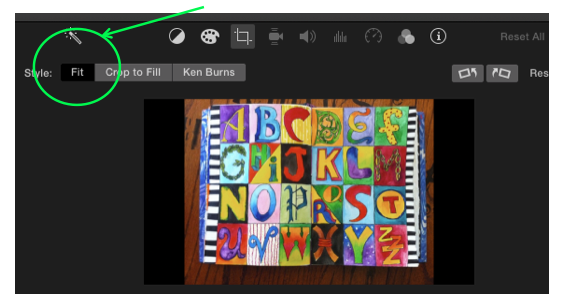
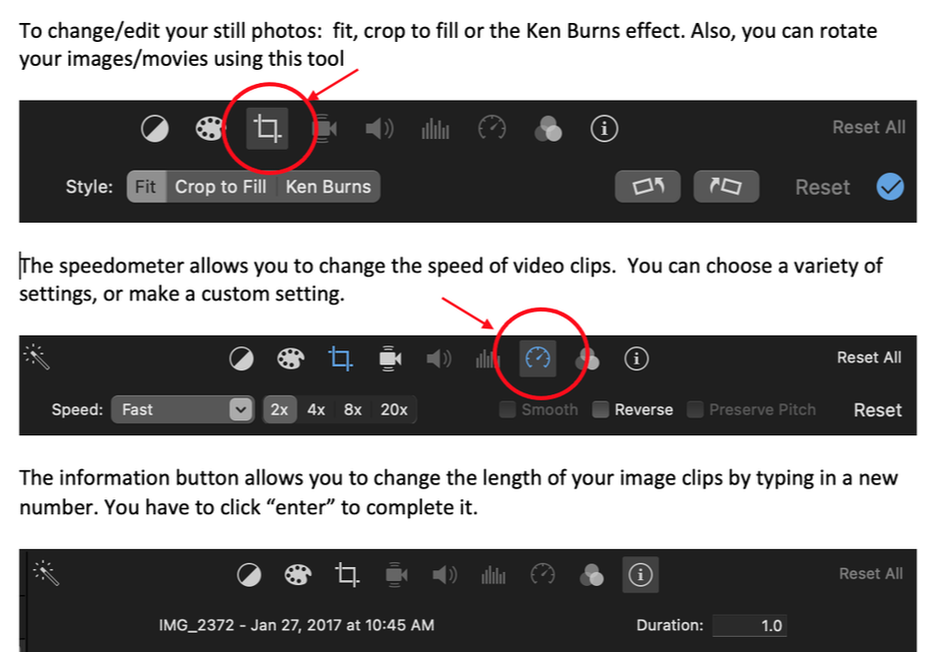
After you click on that link, you'll see a dialog box. Click on "fit" and that will remove the effects and put your image in full screen. You could also click on "crop" and do some cropping of your images, and you'll notice there are also buttons to rotate your images here.
To make your pictures shorter in length, simply click on the picture in the workspace at the bottom, then drag the yellow handle to make the time shorter.
|
|
|
Continue adding and editing your images until you're happy with the file. Now you can finalize your project.
To make your movie ready to upload to Youtube, you need to export your movie. Go to File>Share>File. This will process all the pictures and sound and put them together in a shareable movie. When you click on this, you will get a chance to rename your file, and determine where you want to place it. Place the final file in your podcast file folder.
There is also an option to share directly to YouTube -- you can try this, although many students have reported that this is often buggy and not dependable, so you will be able to share using the instructions above if this does not work.
To sum up: adding images to your podcast
- Adding images will be on a mac using iMovie, or on a PC using Windows MovieMaker.
- Import your finished audio file. (drag the mp3 file into the movie file)
- Drag your images into the movie making program. Reorder and change times for each image so that it fits into your narrative.
- Save your podcast: go to Share>Export. Save on the desktop so you can find it easily.
- upload to YouTube, make sure you choose "public" or "unlisted" (not private!)
|
|
Windows
A good, free option Is Open Shot. Very similar In operation to IMovie https://www.openshot.org/ |
There are a lot of great youtube tutorials out there - I am adding a few that might help you add some features to your own tutorial.
Basic iMovie: https://www.youtube.com/watch?v=U1Hd60lwOyA
Adding text over your video: https://www.youtube.com/watch?v=tswHos_UsAs&t=281s
Adding subtitles: https://www.youtube.com/watch?v=ttoKCLy3XoI
Speeding up and slowing down clips: https://www.youtube.com/watch?v=Gg7EUlRZ5Q8
Creating custom text overlays: https://www.youtube.com/watch?v=HzqKz0HL_Hs
